Golden Rules for perfect needlepoint
The many helpful tips one picks up on class, swapping ideas with groups of fellow stitchers or from the many excellent books on the subject cover a great deal; starting and finishing a thread, clean and dirty holes, using the right ply after stripping it to mention just a few.
I could go on all day however I realised recently that there are some ‘rules’ that are applicable to all needlepoint, Florentine, Stitchery, Shadow stitching and even pieces worked entirely in Basket weave tent stitch.
So to share my ‘golden rules’ with you
Choose your design with care
because you love it
 because it has good quality materials, even weave canvas, interesting threads and where necessary clear instructions .
because It doesn’t work the design in ‘half cross stitch' which will distort the canvas and not give good weave. Similarly, should you work areas with basket weave (diagonal tent) there will not be sufficient thread.
because, even though you love the design you don’t like the colour schemes offered or the mesh provided, is the supplier able to change them for you?
For a complicated design (possibly a group of your favourite flowers to fit a specific place) it may well be wise to have – and pay for – a full size drawing of what the artist believes is your wish; this could be full colour or just a line drawing.
Because you know of someone to make it up well when finished – your shop or teacher may well have suggestions. I know I never design something without a good finisher in mind.
While working the design
Marking the centre and all four sides of the canvas with thread – important as heavy pencil marks might show through eventual stitching and the central marks on the edge of the canvas will prove most helpful should you decide on a Border.
If order of work is suggested follow it; most likely the piece has been test stitched and the person(s) have worked out the best order to work it.
Read notes for any threads you haven’t worked with before
Work on a frame
Start threads in the direction of the work and finish threads generously, nothing is more frustrating that threads popping out of a finished piece. Take extra care if strong colour mixes are used eg black and white OR a lacy background is planned.
Having it made up
You already know of a reputable person/company (see above) who will do justice to your piece as a further investment of your time.
 Most maker-ups will have examples of finishing, framing etc to show you however for something unusual a photograph will give a clear idea of what you hope to achieve. With my Vide Poche I both had a photo of examples, although in porcelain, gave a clear idea and I went to my framer on three occasions to discuss how he would like me to prepare it for him
Two points often forgotten
Any piece to be made up as a knife edge cushion, even with a cord or fringe, should have at least two rows of Continental Tent around to allow for turnings.
Always check the state of the upholstery on chairs or stools; if extra padding is needed allow the extra canvas and stitched area to have this done before the completed piece is fixed. The needlepoint will give pleasure for probably longer than a fabric but doesn’t benefit from saggy seats!
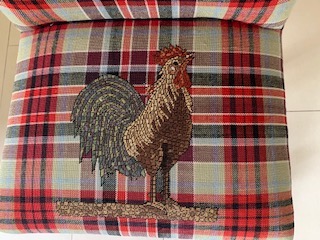
Both the tartan and the monogram and cockerel are stitched.

Comments
Post a Comment